Reference Workflow

22 01 2023

This past May I graduated with my PhD. I initially typed that sentence as “I finished…”. But, truly, like a wedding is the formal start of a marriage, the conferment of the PhD degree is just the formal start of a writing career. In the months since I walked across the stage I’ve been trekking through the bog of drafts, revised drafts, and revisions of revised drafts in the pursuit of the research Holy Grail… the peer reviewed paper in an impactful journal.

For me, the most challenging aspect of completing my dissertation, and revising it into publications, has been keeping track of my source material. Over the past five years I’ve tried, discarded, and modified countless ways of tracking the dozens then hundreds, maybe thousands, of references that inform my writing. It turns out, the reading is the easy part. Finding that idea kernel a month later in mounds of paper can take a frustrating amount of time. Enough time that a tracking system became essential. I needed a system that was flexible yet powerful – that would get me to the key ideas easily. I tried color coding, accordion folders, foot high paper piles… until I burned through reams of paper and boxes of laser toner. But, as the piles grew, and the more I organized, the harder it became to find the ideas I was seeking.

I like reading on paper. I like highlighting. I like making notes in the margin. I adore index cards. But, I was drowning in paper. I had to change.

I’ve long read novels on a Kindle. However, I resisted electronic reading for “serious” work. I couldn’t see how it would work for me. But, I had an iPad mini. And, I saw how my students were using the app GoodNotes for annotating class materials. So, I gave it a try. What a game changer!! Going electronic meant giving up my trusty paper, but pdf scans still look like paper. I thought it would mean giving up my fun highlighters and pens. No – Good Notes has fun highlighters and pens.

Okay, so I was making good progress plugging along with my electronic reading – but as I mentioned above, the reading is the easy part. I still had to figure out how to index the key insights for easy retrieval. I had to let go of my trusty index cards, and move to trust a citation manager. I tried a few and found Zotero had the most reliable sync. It allows notes and tags – but they do require some maintenance to be maximally useful. Initially my Zotero was kind of a mess. The resources were entered by the system through a Google Chrome extension button, but I didn’t maintain it beyond that. It was useful for making reference lists, absolutely, but it didn’t help me track my ideas.

My organizational break through came through an ordinary tool that turned out to have extraordinary usefulness – Google Drive. When I realized that Good Notes and Google Drive can talk, I had found the workflow key. I could let go of trying to keep all the reference plates spinning in my head, and trust the system. And, it also gave me a way to pair my reading habit with my Zotero organization, building a stronger system.

The system:

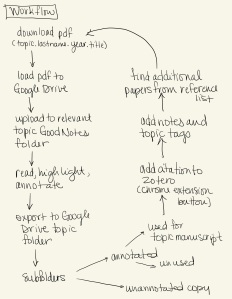
Workflow diagram
  • First, I download the article. I typically search through Google Scholar, because it’s linked to my school library account. EBSCO and other search engines are also options, depending on what paywalls I need to go through.
    • I name files of downloaded articles very specifically so I can quickly identify duplicates: topic, last name of first author, year of publication, title
  • Next, I load the pdf into Google Drive.
  • When I sit down to read, I pull articles from Google Drive into my iPad GoodNotes app.
  • As I read in GoodNotes, I highlight and annotate the articles electronically – directly on the pdf pages.
    • I also highlight any supporting references cited by the authors that may provide further insight
  • I then upload the annotated pdf back into Google Drive.
  • Next, I use folders to keep order in my Google Drive.
    • I upload each article into the topic folder it matches. I’ve found it’s best to do this soon after reading, or I get bogged down
    • Within the topic folder I have three subfolders.
    • 1. One for the unannotated original article copy
    • 2. One for the annotated copies of articles I’ve read but won’t be citing in my manuscript
    • 3. One for the annotated copies that I am likely to cite in the manuscript
  • For the articles I plan to use, I add their citation into Zotero
    • In Zotero you can go wild with folders and tags, but that’s a topic for another day
    • I add my notes from my reading into the notes tab in Zotero – this is key because it makes them searchable (side note of a benefit to GoodNotes – handwritten annotations in GoodNotes are searchable within that app).
  • Finally, I go through the references of the article and search, typically in Google Scholar, for any I want to read. I download them or request them through Interlibrary Loan right then, before I forget
    • Those pdf downloads then get loaded into Google Drive, and await the process starting again

A workable workflow combines flexibility with enough ease of use that I’ll stick with it. My goal is to read one article a day, at least five days a week. I’ve stuck with this now since October. Searching my notes in Zotero allows me to identify insights quickly, making my writing time much more streamlined.

What works for me is not going to seamlessly work for others. But, I share this to provide insight into elements of a system that may also help others tame their piles of paper.



#windowsfail

5 12 2015

My first twelve years of computer ownership involved Commodore products. Twenty years ago I got my first Windows PC, in order to crunch my grad school data on Excel.  At the time, I was fluent in Commodore-speak, Mac-speak, DOS-speak, and the emerging Windows-speak.  I knew how to program in BASIC, and later in C++. My military training school included a month of DOS, and I could work my way around the C drive with the best of them.  When I arrived at my first assignment, it was during the shift to Windows, and I was an early adopter.

sad faceNow, twenty years after getting my first Windows PC, I spent three hours yesterday trying to do one simple thing – boot into safe mode to uninstall Windows 10.  Never got it to work.  So, my only-three-year-old laptop is a blue screen brick with a big old “bad_system_config” unhappy face icon screen message.  I want to punch it in its unhappy icon face.  But, I doubt that would fix anything.  And, I’d probably get some sort of toxic screen chemicals in the cuts.

When did this happen?  When did tech become so bloated and confusing?  Why can’t I even get to a Format C: anymore?  (I tried it in desperation, but the computer refused to even let me go there).  And, trying Google for help?  Basically two camps – too simple, or too complicated.  Yes, I tried rebooting.  No, I don’t want to rebuild the machine.

I’ve decided it’s a planned obsolescence plot.  Sure, Macs cost more than PCs – but, the six-year-old Macs in the house are running without a glitch while we seem to be stockpiling broken PCs in every closet.  Since PCs are cheaper, they must have terminate code somewhere to cause us to give up and buy new every few years, right?  So frustrating.

It’s all a nefarious plot.  I’m sure of it.


Moving toward content immersion

21 11 2015

Over the past 15 years, online learning has experienced a paradox.  As video streaming speeds have increased and bandwidth limitations have decreased, students are increasingly less likely to watch long instructional videos.  In fact, data gathered from the viewing habits of thousands of MOOC students show that the average time students stick with an instructional video is six minutes – regardless of the length of the video.

In 2007, advances in streaming speeds made it feasible for me to start creating and sharing “lecture tidbit” videos with my online students.  I had a (then) cutting edge (and expensive) home set-up with a microphone headset, wired Wacom tablet, white board drawing program, and Camtasia screencasting program.  My videos averaged 15-20 minutes long.  Students told me they watched them over and over.  Those videos are still accessible and active.  The last time a student told me they watched one of them “over and over”?  At least three or four years ago.

It’s time for a change.

I’ve started to replace the videos.  I’m shooting for concentrated bursts of information, no more than two minutes long.  I’m making the videos part of narratives – more of an immersive experience – embedded within storyline presentations, allowing for not only instruction – but also practice and self-assessment activities.  My first overhaul has been my pharmacology med math activities.  Formerly, the activities were static Power Point and worksheet based.  Now, they are dynamic.

2015-11-17 11.59.10The new activities use video and practice embedded into Articulate Storyline presentations.  Storyline is a pricy program, but Office Mix, a free Power Point add-on, has some of the same rudimentary functions (including self-assessment quizzing).  Other than Storyline, the tools of the screencasting trade have decreased in cost and increased in ease of use and access.  I record video on my phone, using the native camera app.  I have a small flexible tripod for demos.  For whiteboard videos, I use the Vittle video app on my iPad – no dedicated drawing tablet required.  Both Vittle feed and camera app videos upload seamlessly into Storyline. And Storyline, an HTML 5 publishing product, avoids the device limitations of Flash.

Once published, students can access the activities from both desktop and mobile devices. My old Camtasia videos, uploaded to the LMS, were only available on LMS-compatible devices.  Since my college uses an outdated non-mobile  LMS, that was a limitation.  Over time, I had transferred some of the videos to YouTube to increase accessibility. But, YouTube does not allow for interactivity. Storyline activities can be hosted both within and outside of the LMS.  I maintain my own domain and website for maximum flexibility, but most schools will also provide server space to host the activities.

Online education is a field where the only constant is change.  One of the things I love most about working in this area is exploring all of the ways to help maximize student learning.  Moving from text to video in 2007 increased student engagement.  I anticipate that moving to an interactive video/skills mix will provide even greater levels of immersion.


Online Ed: Riding the third wave of tech change

31 10 2015

I recently read an essay in the Chronicle of Higher Education that got me thinking about the changes in delivery modes that have occurred during my sixteen years as an online educator.  As I see it, we are now within the third major wave of change.

In 2000, online education was a revolutionary idea.  Correspondence courses had been around for decades (maybe centuries?), but doing away with the post office and allowing for real time communication over the dial-up phone lines was an intriguing concept.  We didn’t really know if the mode would take off, but the first wave of change – the move from dial-up to cable speeds facilitated an enrollment explosion.  The increased speed allowed online course delivery to co-evolve with digital photography and videography.  When I first started teaching anatomy online (and included model building), it was not unusual for students to mail me physical photograph prints of their work.  Now, less than 10 years after that course first went live, I doubt any of my students have daily access to a film camera. Content delivery, in the dial-up days, was nearly all textbook based and heavy in reading.  While I provided notes, large image-rich files were discouraged because of bandwidth limitations.  Around 2002, I moved to cable internet.  Oh, the possibilities!2014-05-03 14.58.59

The next wave of change in online education involved the rise of Apple laptop and desktop computers.  Long used in K-12 education, most colleges in the early 2000’s were using primarily PCs in their general computer labs, and most students had Compaq/HP/Dell machines at home because of the lower cost.  In the early days of the PhysioEx and Virtual Unknown lab simulation programs I use for class, only PC CD versions were available.  Students who owned Apple machines were required to travel to a PC-based computer lab to do their work.  Around 2012, both of those programs switched from CD to browser-based delivery, and the PC vs. Mac divide was no longer an issue.  Nothing I do in any of my classes is now limited by machine or OS type.  That wave has largely passed.

The current wave of change in online course delivery involves desktop vs mobile course access.  Although Apple computers never dominated the desktop market, the iPhone and iPad product lines do dominate the mobile world.  And, Apple products do not play Flash-based content.  This means that a student, expecting to complete my online course on an iPad, is not able to do so.  Will that change?  Yes, I’m sure it will.  HTML5 and increasing processing power of mobile devices will certainly give a larger degree of flexibility and accessibility to mobile content in future years.  The main limitation to completing work on the phone will soon be, for most students, screen size.  I recently upgraded to an iPhone 6 Plus for the screen size.  If I wanted to, I could physically do most of my day to day work on my phone, but I certainly wouldn’t want to – my eyes would protest.  However, someone with eyes much younger than mine may wish to work primarily from a mobile device.  The new Windows phones can even dock with an external monitor – can Apple be far behind on that?

When I taught my first online course I could not have foreseen that, down the road, I would be able to take pictures and videos on my phone, and upload them to my courses – where students would then access them on their phones.  As someone who is an early tech adopter, always looking to play with the next new thing, I am excited to see what comes next.  Virtual reality labs, maybe??  Please??


Fifteen apps for productive online teaching and learning #onlineed #OER

17 10 2015

Photo Oct 09, 7 26 05 PMLast week, I wrote in support of mobile devices in the classroom.  This week, I’ll explore some apps I use in my own teaching and learning process.  As I redesign my curriculum to emphasize depth of knowledge and decrease reliance on commercial textbooks, I rely heavily on apps that sync across all popular platforms.  Throughout the day, I move continuously between my PC, phone, iPad, and Mac so any app I use must either sync reliably across those devices or must offer cloud access.

Productivity and Organization:

  1. OneNote: My blog posts are composed in OneNote. The unit outlines for my writing projects, including my OER textbooks, are in OneNote. My grading rubrics and keys are in OneNote.  My semester grading checklist, curriculum revision lists, and committee meeting notes are all there.  My academic department started using it this year as a collaboration space.  I was a late comer to the OneNote party – I’ve been using it less than a year – but within a few days of starting it took over as my primary ongoing work tool.
  1. Wunderlist: To-do apps are my weakness – I have no idea how many I have tried – dozens for sure. When I got my first iPod touch back in the day, I tried app after app – eventually landing on Wunderlist.  Whereas I use OneNote for ongoing and long-form projects, Wunderlist is my daily task app.  With repeatable tasks, Wunderlist is what I use to remind me that my textbook order is due each October and that I need to email my students next Thursday to encourage them to start their project.  My grocery list, travel packing list, and Kindle pre-order release date favorite author list are all in Wunderlist.  The benefit to Wunderlist over OneNote is timeliness.  Wunderlist pops the task out to me, OneNote makes me remember to go to the task.  In theory, you can set due dates and reminders for OneNote, but my version doesn’t have the “Task” tab in the menu bar and I haven’t been able to figure out how to add it.
  1. Dropbox: When I was in grad school, in the 90’s, I saved my research data Excel files to floppy disks and snail mailed a backup to my mom.  I also gave a backup to a neighbor.  Later, when I needed to move files between my home and work computers, I used thumb drives.  Now, I use Dropbox – files, pictures, screen shots all go to Dropbox.  My camera roll uploads automatically from my phone to Dropbox. It’s is accessible from all of my devices – including my phone – so sending a file or example photo to a student is easy, even away from my desk.
  1. Sunrise Calendar: Like to-do lists, I’ve lost track of how many calendar apps I have tried. Sunrise is the first one I have found that fully and reliably integrates my work calendar, personal calendars, and Wunderlist tasks in one place.  Sunrise is available as a Chrome extension and as a mobile app.
  1. Pocket: I have a love/hate relationship with bookmark apps/sites. I use Pocket as my “read later” repository.  Unfortunately, it seems I rarely have time to actually “read later” so it’s become a sort of link graveyard.  But, I still send links to it regularly, most frequently from Twitter.  Pocket allows tagging and sorting, but I don’t use it to store active resources.  Items I have actually read and want to save for later are stored in Diigo.  Links I use daily are stored on my start.me homepage.
  1. Relax: My kids are in their 20’s and are at that in-between almost-launched stage. Since I work from home, a good pair of headphones and a relaxing noise reduction program is essential to my ability to focus productively.  On my phone and iPad I use the Relax app.  On my PC, I use YouTube playlists of either focus music or nature sounds.

Content Creation: 

  1. Paper by 53: I write OER textbooks and develop OER activities. Engaging content requires illustrations.  Although open photo resources are available through Creative Commons licensing, I’ve found that I enjoy drawing my own diagrams and cartoon pictures.  I am no great artist, but I’ve been scratching out teaching images since back in the days of chalk on the green board.  One of my fondest memories is of my first whiteboard and the amazing four colors of Expo markers with which I could suddenly draw.  As a science teacher, diagrams and images have always been the bulk of my lectures. The Paper app provides an easy way to include my sketches in my OER content.  Creating the illustrations saves me the time consuming step of explaining what I want to an illustrator, paying said illustrator, and/or spending hours searching through open source images for what I need.
  1. MindMeister: When I outline content, I use OneNote. When I move the outline to text, I use Scrivener.  But, before I get to the outline or writing stage I first need to brainstorm idea links and relationships.  I’ve found that brainstorming is most effective when I use a free-flowing mind map.  MindMeister is a bare bones mind mapping tool that is accessible from both a browser and an app.  Accessibility is key for mind mapping because I often let content simmer and play with organization and content relationships for days, or weeks, (or months) before I head to the outline stage of development.
  1. Vittle: I just discovered Vittle and haven’t used it for any large projects yet – but I intend to. I played around a bit with the free version and then almost immediately purchased the full version.  Vittle is an iPad screen casting app that does, for less than $10, what I used to use Camtasia to do.  Vittle has a whiteboard pad that records audio and video explanations.  As I move my content from long 20-minute ten-year-old videos into short 1-2 minute focused segments, Vittle will be my go-to whiteboard “lecture tidbit” app.
  1. WordPress: I started my blog over five years ago, but it lay dormant for most of that time. Recently, I’ve begun to write about my teaching process and the tools I use for that process.  I also have used my blog to write out longer-form answers for questions I’m frequently asked by students.  Having a blog post, with step by step pictures available allows me to point students to help without needing to repeatedly explain the same thing in multiple emails.
  1. YouTube: I’ve been teaching online for over 15 years. In the early days, it wasn’t possible to share video content because most students (and teachers) were on dial-up internet modems. In 2007 I started sharing my first video lecture content – as Camtasia uploads into my LMS shells.  By 2012, any new video content I created was going into YouTube instead of into the LMS.  Students can access YouTube independently of the LMS, giving them more mobility and freedom to learn in a time and place that is most convenient for them.  My end of term evaluations always  have requests for more videos and YouTube is where most of those videos land.  Moving forward, I’m using Articulate Storyline and Office Mix to integrate short videos with other content (particularly with self-assessment quizzing) but YouTube will continue to be my go-to for longer form materials.

Inspiration and Information:

  1. Feedly: I’ve always been an RSS fan and the discontinuation of Google Reader years ago left me in a bind. I tried a couple of different replacement readers and Feely is the one that stuck.  I’m not a fan of content aggregators like Flipboard – I always feel like I’m missing something when I allow a service to curate content for me.  I prefer to curate my own sources and a RSS reader allows that.  However, I have recently become a fan of the Skimm and NextDraft newsletters so my Feedly reading had dropped off a bit as a result.
  1. Tweetbot: I created my Twitter account over five years ago, and then promptly ignored it. Recently, at a conference, I learned about Twitter backchannels and I discovered a world of content and interaction that brought together like minds from around the world in collaboration.  I’ve had to back off of Twitter a bit recently because it was sucking me in for hours at a time, but I still find ideas and inspiration every time I check it.  For me, the key to using Twitter is to actively curate my lists.  If someone I follow tweets repeatedly off topic, or their main posts are those status things about how many followers they added that week – they’re gone.  I curate my lists heavily in favor of those who share relevant, timely, content.

Reference:

  1. America’s Navy Anatomy Study Guide: My focus is OER content and this Anatomy guide is the best free mobile app version I’ve found. It has multiple modes, including a quizzing mode, that allows students to drill the bones and muscles any time they have a few minutes to spare.  The key to retention is repetition and ongoing drill is beneficial.
  1. PubMed: Writing OER content requires constant fact-checking. PubMed is the go-to for up to date basic medical science research.  While most articles referenced are behind pay walls (grr…), the abstracts are generally sufficient for a quick fact check.  For deeper research, I’ll then go through Google Scholar to see if the relevant article .pdf has been posted online anywhere.

As an online teacher, I spend hours each day using technology as an interface to interact with my students as they learn.  Since online learning is most frequently asynchronous, I am always excited about tools that improve the learning experience for students when I’m not immediately available for contact.  I’m also always on the look out for OER resources and the tools to help me create them. It’s a happy day when I find an online tool that helps me and my students travel our education journey more effectively together.


FTP and servers and file structure – oh my!! #yesican @articluate #onlineed #FileZilla #commodore64

3 10 2015

Something I’ve picked up from my mom is the mantra “If other people can figure out how to do this, so can I”.  From the outside, we may seem different.  She buys drills, tears down walls, and builds closets and banisters.  I buy software, tear down curricula, and build interactive learning activities.  If you ask my mom why she tears down walls and fiddles with a design until it works, she’ll tell you it’s because she enjoys building things that people can use.  Although our tools are different, our goals and motivations are the same.  I, too, enjoy building things that people can use – I get that from my mom.  She’d tell you we’re not alike, but we really are.  (Yes we are, mom!)

Back in the early 1980’s, I was obsessed with programming on my Commodore 64.  My interest continued through college, where I encountered the Mac HyperCard and PC DOS worlds.  In the 90’s I left home for the military, got married, had kids, went to grad school… and by the time I had time to think about programming again – the tools of that trade had exploded beyond what I could quickly assimilate.  So, I focused instead on the tech I needed for my career.  I mastered Excel data analysis and Power Point motion tracks.  As a teacher, I became the queen of animated Power Points (yes, I was that 90’s stereotype).  In 1999, I was approached about teaching within the emerging online platform, WebCT.  I jumped at the chance! Two of my favorite things – tech and teaching – combined into one?  Yes!!

In the 2000’s, I dove into screen casting – recording lectures for my online students with my trusty Bamboo graphic tablet and whiteboard program.  It was cutting edge to be able to deliver video lectures at the time.  But, in the tech world, new quickly becomes passé. Recently, I have wanted to gain experience with interactive animation to update my content delivery.  I have my own website and I’ve done some rudimentary interactive programming there, but I wanted something more robust.

This past week I published my first interLRSC medmath1active Articulate Storyline quiz activity.  The program has a bit of a learning curve, but there are videos to help.  It’s enough like Power Point that it was fairly easy going.  Until… I couldn’t get the output to upload to my website.  And… there were way too many files to upload individually and keep in order.  And… my web hosting service wouldn’t unzip folders.  So, I got frustrated and walked away for a few days.
Then, as I looked through pictures of my mom knocking out walls and building a closet from scratch, I realized that just like her – if other people can figure this out, so can I.

So, I started researching ways to bypass the program file transfer protocol (ftp) that wasn’t working.  I came across FileZilla, and memories of an ill-fated attempt to set up a Moodle server about 10 years ago came back to me.  I downloaded the software, pulled up some help files, logged into my web host server, transferred the files, got very nervous, and… IT WORKED!!!  I started yelling my version of “Eureka!” through the house, got called a nerd by my son (who was playing video games at the time – the son of a nerd), and posted my joy on Facebook 😉

As they used to say on a famous 80’s TV show… “I love it when a plan comes together!”.

My first project:  http://www.mycozynook.com/215math1.html  More to come soon – I’m addicted now!


PC vs Mac: #howto take a #screenshot #LRSCmurphy

12 09 2015

Evidence of course work completed may be documented using a screen shot.  In order to show that the requested work was completed during the current term, the screen shot must include the time and date.

Showing the Date and Time

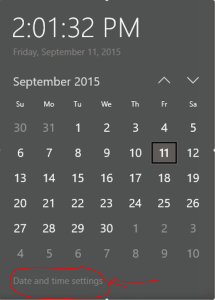
To capture the date and time in the screen shot, they must first be set to appear in the menu bar.  On a PC, clicking or right-clicking (depending on OS version) on the time in the menu bar will bring up the options to change the settings so that both the date and time remain visible.

LRSC date time

On a Mac, control-clicking on the time in the menu bar will have the same effect.  On both systems, hovering over the time will activate a display of the full date.

Screen Shot 2015-09-11 at 1.14.45 PM

Windows Snipping Tool

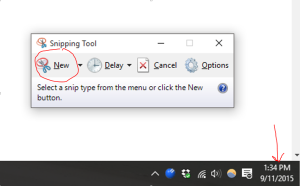
Windows computers running Windows 7 or higher handle screen shots through the snipping tool.  The snipping tool is located in the Windows Accessories area of the applications folder.  It is a good idea to pin this tool to your taskbar so you can find it quickly in the future. Activating the snipping tool brings up a crosshairs cursor that uses a click and drag motion to capture any area of the active screen. Using the snipping tool allows for precise control of the area captured in the screen shot and also allows the date and time to be captured.

Video:  Snipping Tool Demo Video


LRSC snipping tool3

Windows Print Screen Button

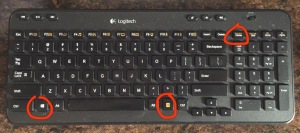
PC desktop computers, with an extended keyboard, may have a “print screen” button (sometimes associated with a function key).  Clicking this button will copy into memory whatever is on the screen at that time.  The copied screen can then be pasted into a document by either home –> paste or Ctrl-V, just as any other copied text or image.  By default, clicking the “print screen” button (and the function key if necessary) will capture the entire screen (including the menu bar time and date).

2015-09-11 13.54.26

If the “alt” key is held down along with the “print screen” (and the function key if necessary), only the active window will be captured into the clipboard.

2015-09-11 13.54.36

Holding down the “windows” key while clicking the “print screen” key (and the function key if necessary) will capture the entire screen and automatically save it to the “screenshots” folder within the Pictures folder.

2015-09-11 13.54.44

MacBook and iMac Screen Capture

On MacBook and iMac computers, screen shots are captured by key combination and are, by default, saved to the desktop.  Holding down the “command” and “shift” keys and pressing the number 3 key will capture an image of the entire active screen – including the date and time.

2015-09-11 13.18.26

Holding down the “command” and “shift” keys and pressing the number 4 will bring up a crosshairs cursor that allows for a click and drag of the parts of the screen to be included in the capture.

2015-09-11 13.18.34

iPhone and iPad Screen Capture

To take a screen shot on an iPad, iPhone, or iPod Touch, hold down the home button and press the power button simultaneously.  This will capture a shot of whatever is on the screen and save it to the Photos app.

Windows RT Screen Capture

There are a wide variety of Windows RT operating system tablets on the market so key code combinations for taking screen shots may vary.  The Windows RT OS does have an app for the snipping tool.  Some Windows tablets also capture screen shots when the Windows button and lower volume button are simultaneously pressed.  Screen shots taken with a combination of key presses are typically stored in the pictures folder on the tablet.